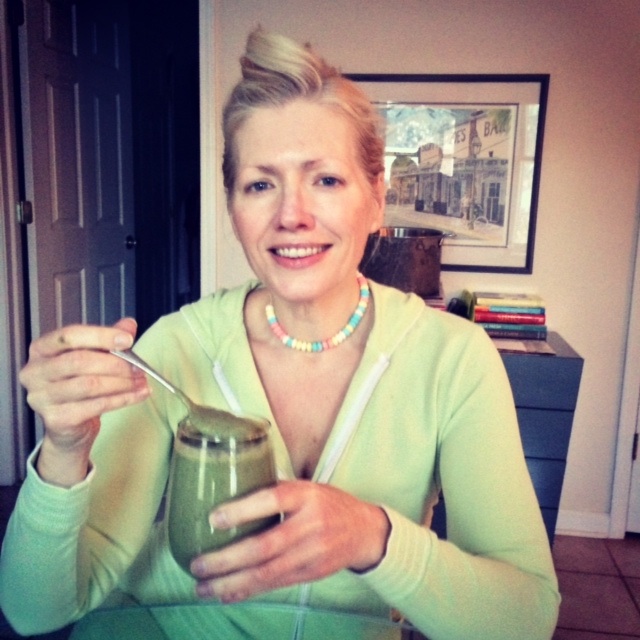
Rumor has it that my beloved Shamrock Shakes from childhood have in excess of 70 grams of sugar per serving! I nearly fainted when I read that. And then there’s the dairy and I’m going to guess it’s not milk from grass-fed cows that’s being used. Yuck. The kid in me will always hop up and down with anticipation when she knows a milkshake is coming. Now the adult in me joins in the jumping because she knows she’s getting nourishment as well.
I’ve long been loving clean versions of chocolate and vanilla ‘milkshakes’ made with protein powder, superfoods, and my beloved unsweetened almond milk. With St. Patrick’s Day upon us, now’s the perfect time to enjoy a smooth, minty shake – with no pesky hangover. So raise a glass with me – you don’t have to wait till the 18th to go green and celebrate your health!
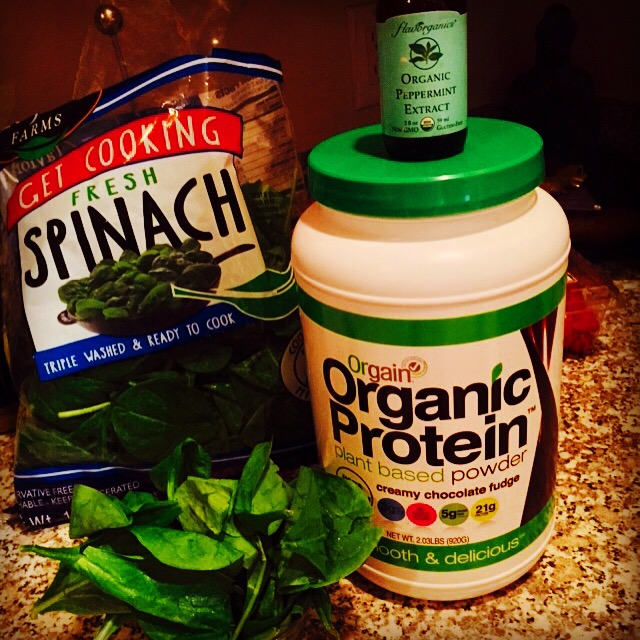
Clean Shamrock Shake
Serves 1
1-2 scoops Orgain Organic Protein Powder, Vanilla
1 large handful of spinach or kale
1/2 to 1 avocado (depending on how thick you like it)
12 ounces of unsweetened almond milk
1/8 teaspoon of peppermint extract
Variation: if you’re a fan of chocolate-mint, add two tablespoons raw cacao powder
The building blocks of a healthy shake
Blend all ingredients in a Vitamix or blender at high speed for at least a minute. Serve immediately. It kills the sugar cravings and nourishes the body with greens and clean protein – what a win-win!
Who says Italians only eat pasta? Their diet is actually brimming with all manner of grains and vegetables. But lets face it, pasta sells. Actually though, there’s nothing quite as delicious as a sandwich whose roots can be traced back to Italy. The following is inspired by one of my most joyful culinary discoveries made on my first visit to Italy, circa the mid-80’s. Madonna was touring the country in fishnets and I was on my second 100-pound weight loss.
Quando sono solo sogno all’ orizzonte e mancan le parole…
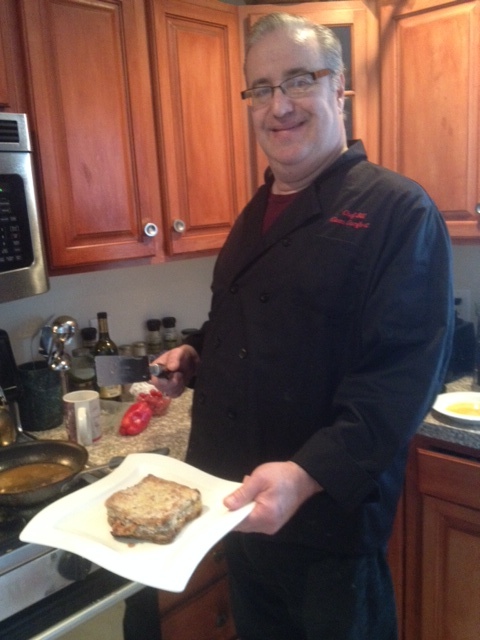
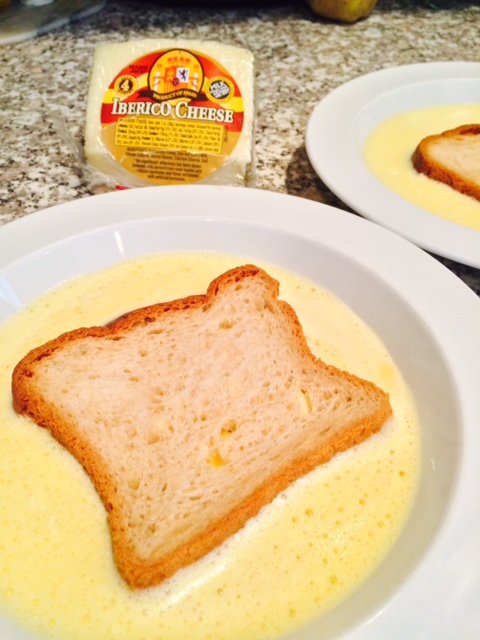
Enough digressing. In the beautiful, medevil town of Siena, I discovered this simple but wonderful northern Italian favorite at a restaurant on those historic cobblestone streets. It’s called Mozzarella In Carrozza and it is, in essence, a gooey, rich, delicious grilled cheese sandwich dipped in egg batter and dusted in flour. My maiden bite almost brought me to tears. I’m a grilled cheese-lover from girlhood but this was something ELSE!
When I stopped eating cow dairy and gluten six years ago I assumed my Mozzarella In Carrozza days were long gone…until I met Chef Bill and he revealed that A) Mozzarella In Carrozza is one of his favorite dishes and B) he could easily make me a clean version with Manchego cheese (a hard sheep cheese with a flavor similar to cheddar) and gluten-free bread. This is one instance when the sometimes cardboardy nature of gf bread can come in handy!
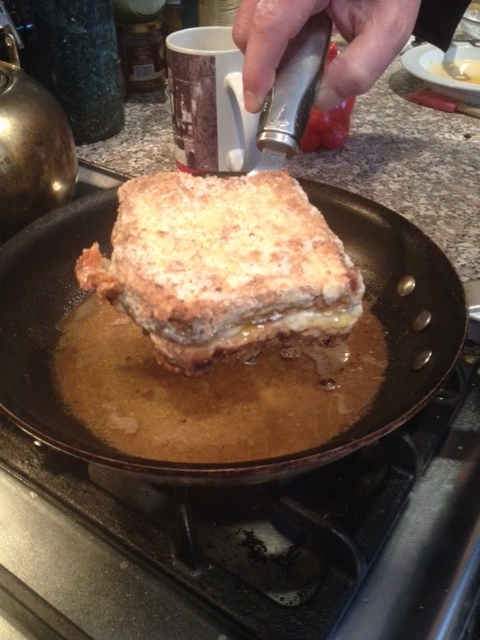
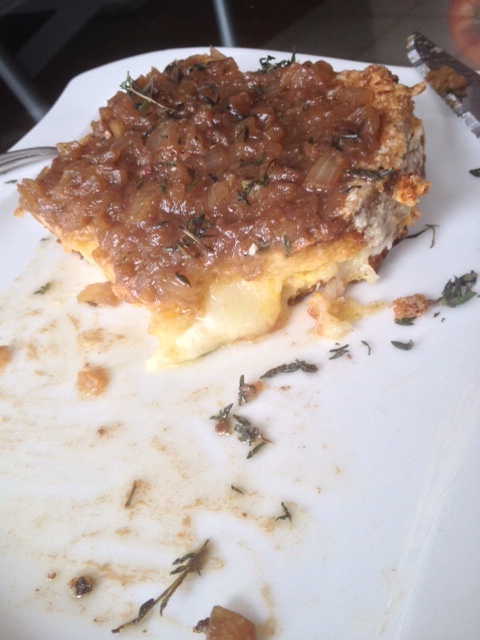
This, my friends, is most definitely a decadent treat. And a perfect one for winter because it’s warm, rich and filling. The traditional method for making this sandwich is to simply egg-batter it, dust the bread in flour and then fry. It’s often served with a side of marinara sauce for dipping. Personally, I love the taste of the oozing cheese so much I prefer it plain, or the Chef Bill method, which he says is inspired by a recipe in cookbook from the now-shuttered Alfredo’s in the Alley restaurant in Burlington. If the anchovy-onion sauce doesn’t appeal to you, by all means, skip it and have your Mozzarella In Carrozza plain or the traditional way. And if you’re cooking for more than two people, simply place the finished sandwiches, uncut, in a slightly warm oven until all are ready. Bon Appetit!
This is no ordinary sandwich
Mozzarella In Carrozza
For the sandwich:
2 slices of gluten-free white bread
1 egg, beaten and set in a shallow dish
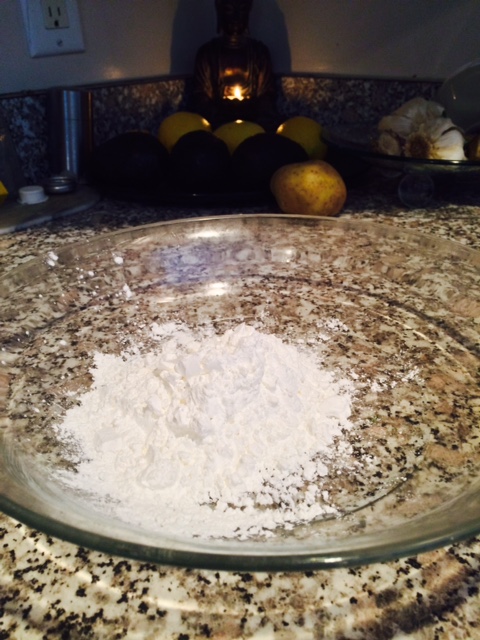
Corn starch for dredging (about a half-cup)
salt and pepper, 1/4 teaspoon each
About two ounces of your favorite cheese, sliced and at room temperature
Butter or olive oil for frying
Corn starch is gluten-free and adds a crisp texture
Egg Wash = Optimal Sensuality
See What I Mean?
For the sauce:
1 small can of anchovies in oil, reserving oil
1 small shallot, finely chopped
1/8 to 1/4 cup Marsala wine
1/8th cup extra virgin olive oil
Fresh thyme or oregano, about a tablespoon (optional)
Instructions:
Heat butter or oil in a medium sized skilled over medium heat.
Place corn starch, salt and pepper in a shallow dish and sift till blended. Make a cheese sandwich with the bread and cheese. With tongs, place sandwich in the egg wash on each side until coated. Remove with tongs and dredge entire sandwich on both sides, making sure all sides and ends are coated. Using tongs, very carefully set sandwich in the hot pan and fry until golden on both sides.
While the sandwich is frying. Heat the other 1/8th cup of olive oil on medium heat and saute the shallot until translucent. Add anchovies and reserved anchovy oil to pan, mashing and moving around with a wood spoon. Let sauce simmer gently for a minute, then turn the heat to medium-high. Anchovies will reduce. Deglaze pan with Marsala and stir in thoroughly. Turn heat down and let simmer for another minute. Put hot sandwich on plate and cover generously with sauce. Sprinkle with fresh herbs. If preferred, sauce may served on the side.
I dove in but stopped in time to snap a photo. Che Buon Tramezzino!
For those bowled over by my (or anyone else’s) before and after shots: There’s no magic moment where it all begins. Healing is a process. A series of Realizations. One big extended Awakening.
People often write to me looking to have it all solved with a diet or food plan. While their intentions are in the right place, an overly rigid food plan usually does nothing more that figuratively tie your arms into an uncomfortable position that you can’t wait to free yourself from.
My starting point…let the rational baby stepping begin.
Very often the biggest and most helpful step you can take is to agree not to diet or force change where food is concerned. It’s a huge and significant load off your back that allows change from within to begin. And you’ll have the time and emotional energy to invest in cementing healthy habits that will feel natural.
As I say in my book “Clean Comfort,” you can’t keep everything intact in your life and expect change. So go for little shifts, instead of black and white thinking.
Are you a fast food addict? Add more produce to your life. Any form will do.
Is soda your drink of choice? Cut back a little and drink water, seltzer, or herbal tea instead.
Feel stymied by a toxic person in your life? Start by being honest with yourself about how it affects you and work up to some straightforward communication.
Baby steps. It’s the best and most enjoyable way to lasting change. The mind and body can only take so much change and shuffling around anyway before they put the brakes on one way or another and tell the torrent of rigidity to talk to the hand.
Baby steps got me to where I am today. Baby steps. All I’m asking you to give up is the All-Or-Nothing belief system.
Lighter, freer, happier, and still baby-stepping. Know why? ‘Cause Life’s a Journey!
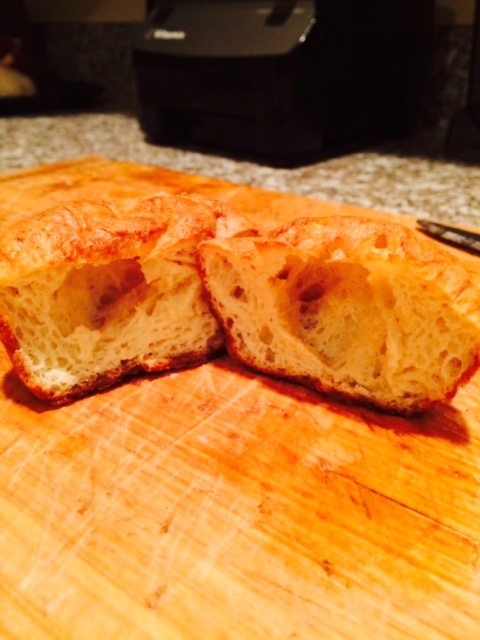
Nothing like a little comfort food that’s clean and won’t give you a hangover! These popover are easy to make and GOOD. They require a bit of attention to detail in order to ensure they rise and turn out light and airy.
In homage to Transformation Tuesday, I give you a transformed recipe! The effort’s worth it and these are a guaranteed crowd pleaser:
2 cups Namaste all-purpose baking mix
1/4 teaspoon xanthan gum
1 teaspoon salt
2 ½ cups milk (unsweetened almond or coconut) at room temperature
5 large eggs at room temperature
2 tablespoons butter, melted
Preheat oven to 425. Spray muffin tins or popover tins with non-stick cooking spray and place in the oven for at least 10 minutes while mixing batter.
Place all ingredients in a large blender or Vitamix. Blend for 10 seconds and no more (it’s important not to overbeat the eggs or the popovers won’t rise).
Carefully remove hot pan from oven. Ladle or pour batter into muffin cups till cup is ¾ full. Bake for 25 minutes then reduce heat to 350 and bake for another 10 minutes. Popovers should be golden brown. Serve immediately.
Wish you could smell these!
Can you hear them begging for a schmear of Kerry Gold?
Protein bars are my sweet-tooth salvation, especially when traveling. Compact and already packaged in airtight containers, they’re easily stowable in suitcases and carry-on bags. And sometimes I slip them into my purse when going to a restaurant, party, food festival, or any other setting when I might be setting myself up to go without as everyone else is diving into donut sundaes or chocolate layer cake. Not only do they satisfy the sweet tooth, they’re anything but empty calories with an average of 20 grams of protein per bar!
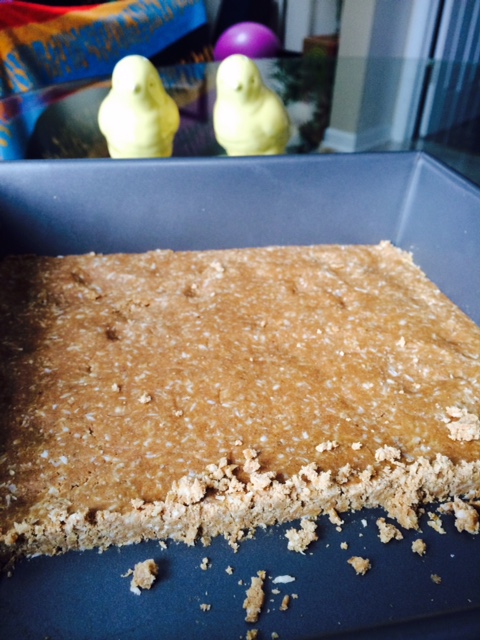
Still, they’re expensive, and a bit, shall we say, chemical- and preservative-laden. Another drawback for me: most of the gluten-free and sugar free options still aren’t great because whey is the primary protein source. Maybe one day brands such as Orgain and Garden of Life will come up with sugar-free and gluten-free protein bars but until that happens, I’m rolling up my sleeves and making protein bars at home. That’s right, it can be done. It’s a bit labor intensive but you control the quality and the flavor, so what could be better? I can’t take total credit for this because the idea is inspired by the wonderful vegan cooking blog Oh She Glows and its genius creator Angela Liddon. I adapted this to be completely sugar-free and to accommodate my undying love of coconut . It’s a pretty accommodating recipe which means you can feel free to amend it to suit your tastes and preferences. Throw in nuts, chips and/or dried fruit if you like. It’s your protein bar. This recipe is a great starting point. Let me know how you like it, and what your favorite version is!
Ingredients:
1 cup oat flour
1/3 cup dried unsweetened coconut
1/2 cup Orgain vanilla protein powder *
½ cup peanut butter (sugarless and non-hydrogenated)
1 tablespoon vanilla
¼ cup coconut oil
¼ cup hot water
Topping
1/3 cup cacao nibs, whirred in Vitamix or coffee bean grinder
1/3 cup coconut oil
1-2 TBS espresso
* The protein powder I use is sweetened so I find these to be sweet enough as is. If you’re using unsweetened protein powder, add more sweetness with 1/3 cup agave syrup, maple syrup, raw sugar, honey, etc.
In a medium sized mixing bowl blend the oat flour, coconut, and protein powder together until well sifted. Add the remaining ingredients. The mixture will probably be too thick to stir so make sure your hands are nice and clean and start kneading. If it’s too dry, add a few more splashes of hot water. Flatten the dough-like mixture into an 8-inch brownie pan and flatten out with your hands until it’s an even thickness throughout. If it’s easier, flatten by rolling with a pastry roller or a pestle from a mortar and pestle. Freeze the bars for 10 minutes.
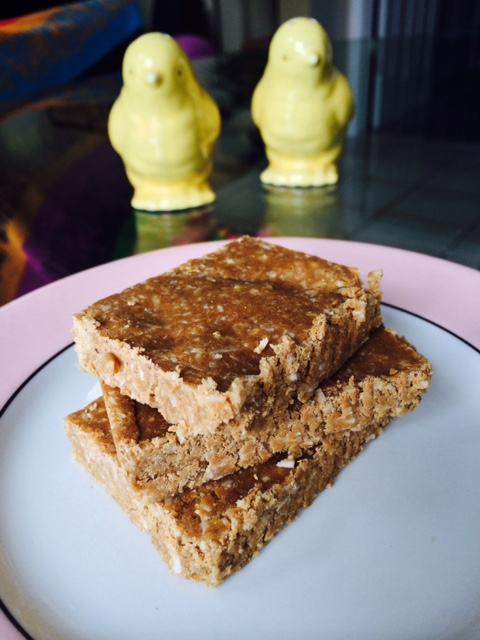
Good enough without the drizzle, actually
See what I mean? Add a cup of herbal tea or almond milk and you’ve got Nirvana!
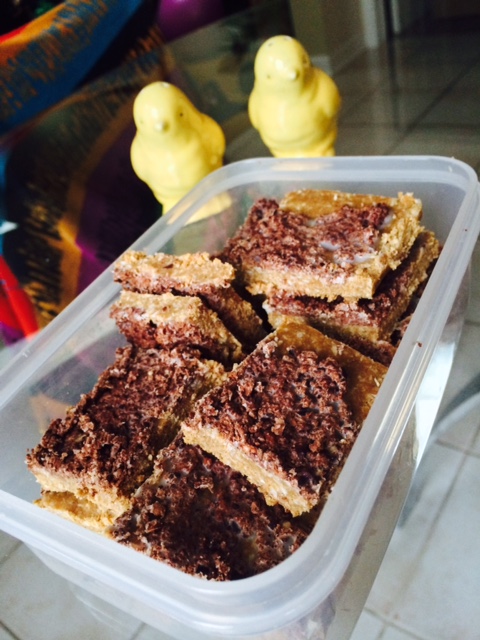
While the bars are chilling, melt the cacao nibs, coconut oil and espresso over low heat, whisking constantly until melted. Cacao nibs are ‘rocky’ by nature and won’t completely melt. Just get it as close as you can. Remove bars from the freezer and slice into squares before drizzling with cacao. These bars can be stored in the refrigerator or freezer for several weeks.
Another option for the topping is to melt 1/3 cup chocolate chips (regular or sugar-free) with 1 tablespoon of coconut oil and drizzle. The cacao nib version has more nutrients as cacao nibs are a superfood. Kids, however, might not dig ‘em so much.
A square of tin-foil make these DIY Protein Bars officially stowable!